Here's a practical way to get more use out of any unused textiles that may be languishing in your linen and clothes closets. For example: those pretty bedsheets that have a hole in them, those faded curtains, or your collection of maxi skirts that are so last year. The easy process for making these rag rugs is basically the same as the one used for our woven mug coasters on a cardboard loom — just on a much larger scale. Grab a large cardboard box, cut up some old fabric, and get weaving!

Things You\’ll Need
-
Fabric strips, 2 inches wide and at least 4 inches longer than desired length of rug (recycling an old queen or king size bed sheet would be ideal)
-
Yard stick
-
Pencil
-
Piece of cardboard the same width as and 4 inches longer than desired rug.
-
Fabric scissors
Step 1: Make the Cardboard Loom
For your loom, cut a sturdy piece of cardboard the same width as your desired rug, but adding 4 extra inches to the length.
Using your yard stick and pencil, place marks 1/2 inch apart along the two short edges.
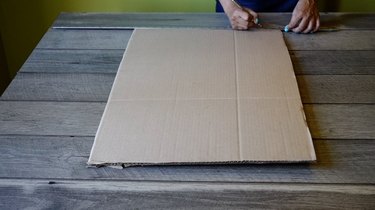
Measure and draw a line 2 inches above the same edges you marked. Cut 2-inch slits 1/2 inch apart along the edges, using the marks and line as guides.
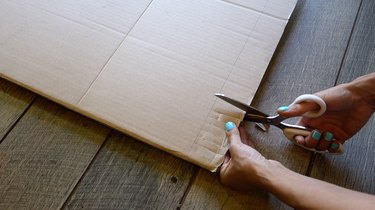
Once you've finished cutting slits on both edges, your loom is done.
Step 2: Prepare to Weave
Before you can start to weave, you'll have to insert fabric strips through every slit you cut. These will be the vertical/lengthwise strips in your woven rug. In weaving parlance, these are known as the "warp" and this process is referred to as warping the loom.
Depending on how thick you'd like your rug to be, group 2 or 3 strips of fabric together.

Insert the group of strips into one slit, then into the corresponding slit opposite as shown in the images below.
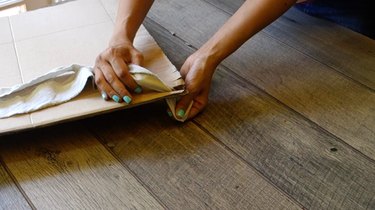

Repeat until all of the slits have been filled.
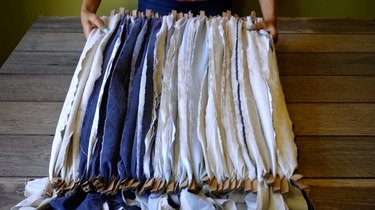
You're now ready to weave!
Step 3: Weave Your Rug
Take a single strip of fabric and, starting at one end, weave it horizontally/widthwise through the vertical strips, over one group and then under one group, all the way across. In weaving terms, this horizontal strip is called the "weft." Work this to the other side to complete your first row of weaving.
 Pulling a single strip under the first group of vertical strips. Weave over one group and under one group to the end. Image Credit: Maya Marin
Tip
In the beginning, while your vertical strips are very loosely lying on top of the cardboard, it'll be a tricky to pick out which vertical strips belong to which group, and the order in which the groups are lying side by side. Order is important! Also, the first couple of rows you weave through will seem to disappear within the loose vertical strips. Just proceed very slowly at first and make sure you're weaving over and under the groups correctly. It will get much easier once you've woven a few rows and your weave becomes tighter. Eventually, the tension created by your horizontal strip will hold the groups of vertical strips firmly in place, making the groups easier to discern.
 It might be difficult to see the horizontal strips at first. Image Credit: Maya Marin
Once you've woven your first strip all the way to the end, make sure you leave a long tail where you at the beginning of the first row (see image below). This tail should be about 1 ½ the width of your finished rug, and it will be used to secure the edge when you're done weaving.
 Leave a tail approximately 1 1/2 the width of your rug. Image Credit: Maya Marin
Using the same strip, go back and weave a row in the opposite direction from your first row. Continue weaving back and forth widthwise all the way up the length of the rug.

Joining a New Fabric Strip
Before you start, you can sew a bunch of strips together end to end so you've got a super duper long strip of fabric for your weft, but there's an easier way to join a new strip to the end of your last strip when it runs out.
 Reaching the end of a strip. Image Credit: Maya Marin
Cut a hole at the end of the strip as shown below.

Take a new strip.
Cut a small hole at one end of the new strip. We'll call this the front end.
Insert the new strip of yarn, front end first, into the hole you cut at the end of the old strip. Pull it through a few inches.

Drop the front end of the new strip you just pulled through and take hold of the back end of the new strip of fabric.
Insert the back end of the new strip into the slit you cut into its front end.

Pull it all the way through until taught. The two strips are now joined end to end.
You're now ready to continue weaving where you left off.
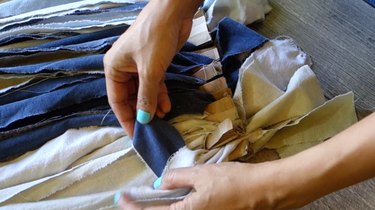
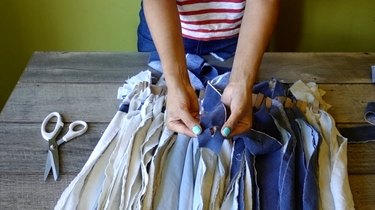
Step 1: Finish Fringed Edges
Once you've reached the opposite edge, you're practically done! All that's left to do is to secure the last and first rows of your weaving, so that your rug doesn't come undone.

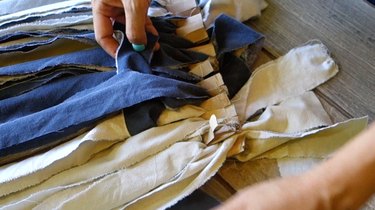
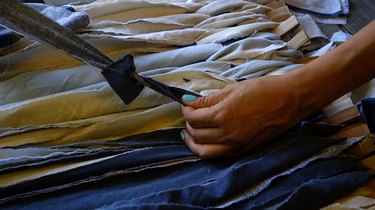
To secure the last row of weaving, you're going to go back in the other direction, inserting the strip underneath wherever your horizontal strip went over the vertical strips on the last row. These are indicated by the arrows shown in the image below.
 Pull the ending strip under and through here all the way across to secure the edge. Image Credit: Maya Marin
  Insert underneath and pull through. Image Credit: Maya Marin
  Repeat all the way across. Image Credit: Maya Marin
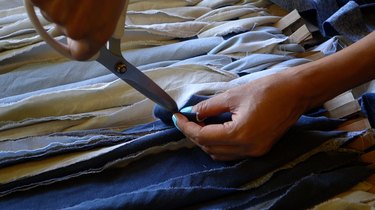
Once you've done this across the row, that edge is secured. Now, do the same with the opposite edge using the long tail you left when you started weaving.

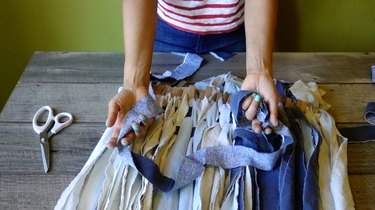
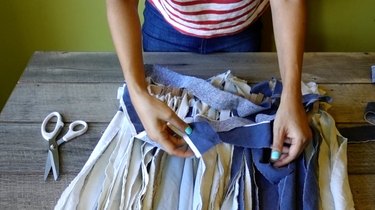
Finally, trim the fringe to your desired length.

Your brand new rag rug made from old fabric is now ready to enjoy.


This tutorial is based on the woven rag rug project featured in A Beautiful Mess.