Things You\’ll Need
-
Hardbound book with dust jacket, approximately 6"x9"
-
2 L-brackets, 4"x4"
-
#10 x 1-1/4" flat head screws
-
#10 x 1-1/4" plastic anchors
-
Level
-
Drill with 1/4" drill bit
-
Hammer
-
Pencil
-
Hobby knife
Tip
This shelf is for a standard 6"x9" book; for larger books, use a 6"x6" L-bracket instead.
Instead of using drywall anchors, look for studs on the wall and attach the L-brackets with wood screws alone.
Warning
Do not place bookshelves above beds, as books may fall during earthquakes.
 Floating book shelf Image Credit: Jonathan Fong
Are you looking for a creative bookshelf solution for your wall? Here's an "invisible" bookshelf that is both fun and functional. Books appear to be floating on the wall without a shelf, but the shelf is actually the bottom book. And bibliophiles will be happy to know that this project is created without damaging the actual book. What a novel idea!
Video of the Day
Step 1
 Indicate where holes will be drilled Image Credit: Jonathan Fong
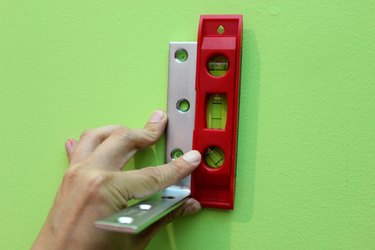
Place one 4"x4" L-bracket on the wall where you would like the bookshelf. Use a level to ensure it is perfectly vertical, and make a pencil mark in the top and bottom holes. (Note: This shelf is for a standard 6"x9" book; for larger books, use a 6"x6" L-bracket instead.)
Step 2
 Mark two points 4-1/2" from the first marks Image Credit: Jonathan Fong
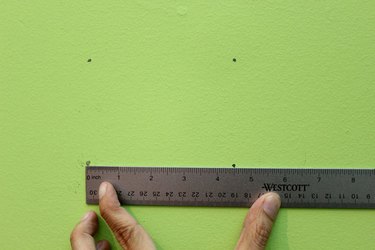
Measure 4-1/2" to the right of the two pencil marks and make two more marks. Use a ruler and a level to help. This is where the second L-bracket will go.
Step 3
 Drill holes Image Credit: Jonathan Fong
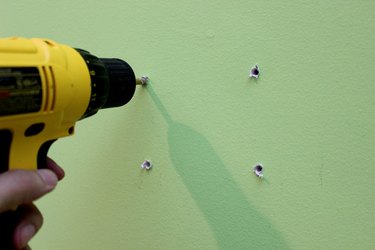
Using a 1/4" drill bit, drill holes at the four pencil marks.
Step 4
 Insert drywall anchors Image Credit: Jonathan Fong
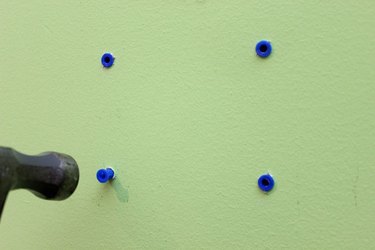
Hammer drywall anchors into the holes. (Note: Instead of using drywall anchors, look for studs on the wall and attach the L-brackets with wood screws alone.)
Step 5
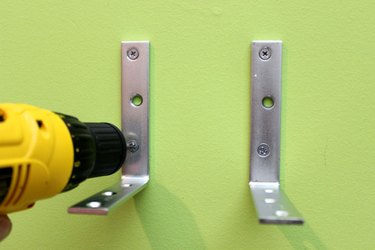 Secure L-brackets with screws Image Credit: Jonathan Fong
Position the holes in the L-brackets on top of the anchors and screw in flathead screws to secure the brackets.
Step 6
 Cut two slits in dust cover Image Credit: Jonathan Fong
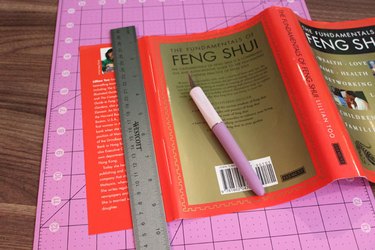
Remove the dust jacket from the book. With a ruler and hobby knife, cut two 2" slits in the dust jacket fold where the back cover meets the back flap. The slits should be about an inch from the top and bottom edges of the dust jacket.
Step 7
 Slide the two slits into the L-brackets Image Credit: Jonathan Fong
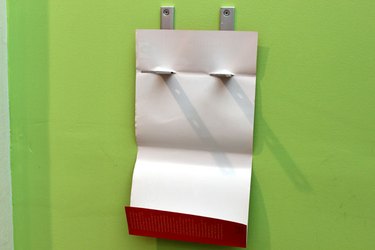
Slide the two slits of the dust cover into the two L-brackets.
Step 8
 Wrap dust jacket around the book Image Credit: Jonathan Fong
Rest the book on the two L-brackets with the spine facing you. Lift the book's front cover and pages, and fold the back flap of the dust jacket over the inside back cover.
Step 9
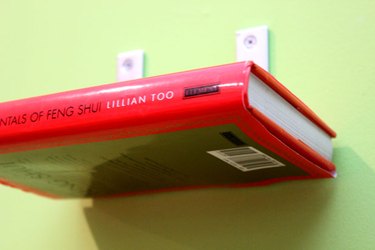 Hide the L-brackets with the dust jacket Image Credit: Jonathan Fong
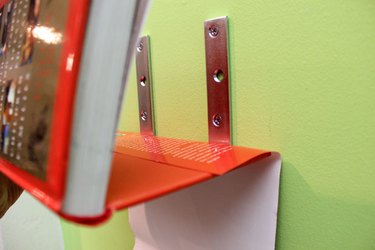
Put the front cover and pages back down, and wrap the dust jacket over the rest of the book. Now when you look underneath the book, the dust jacket has covered the L-brackets so it looks like the book is floating. Stack books on top of this shelf, being sure not to exceed the weight limits of the drywall anchors.